
Truss Rods Gone Bad – A guitar design element that didn’t work
WHAT WAS I THINKING?
This is a question that you could ask about practically every mistake ever made. Nobody ever gets up in the morning and asks themselves “what can I screw up today?” All mistakes start with good intentions, and this case was certainly no exception.
I was in the process of designing my first archtop acoustic guitar, using the Benedetto book
as a guide. The usual truss rod configuration for these is a single or double action truss rod with the adjusting nut located at the peghead. Since I prefer to not have the adjusting nut cavity at the thin transitional area between the peghead and neck, I mentally designed an implementation where it could be on the body end instead.
THE PLAN
My approach was to adapt the Cumpiano-style single action rod with a threaded brass spacer as the adjusting nut, just as I’d used on acoustic and electric guitars designs done previously. This design had proven to be effective, and fabricating the rods was an enjoyable process involving fire and simple hand tools.
The threaded brass spacers I had were about 3/8” across and about 3/4” long. Again, this is typical for this design. The cap for the rod was done using the updated design shown on Cumpiano’s website rather than the one in his book. I figured I’d have enough room on the bottom of the fingerboard extension to accommodate the nut and whatever socket would be required to adjust it.
To prevent the transitional fingerboard “hump” at the neck/body join, I planned to install a couple of graphite reinforcement bars alongside the rod. That part worked out well. The installation of the rods was easy, there was plenty of room left for the rod and adjusting nut, and the neck is dead straight at the body join.
WHERE IT WENT WRONG
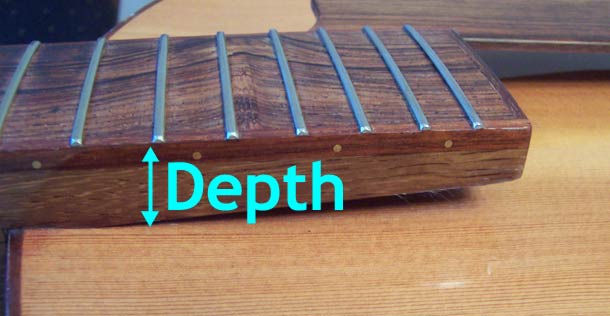
Had the guitar consisted of just the neck and fingerboard, there would have been no problem. However, the rod sits in a channel about 1/2” deep in the neck, and the typical fingerboard extension starts out at a 1/2” to begin with. I could make the slot a bit shallower, but the rod would still make the extension thickness more than what I’d like. By this point in the construction, I’d already cut the dovetail on the neck heel and the body mortise, so changing the neck angle was going to be a great deal of work.
With the fingerboard thickness such as it was, it required the bridge height to be increased. The typical height for an archtop bridge is about 1”, and the saddle height partially dictates the break angle on the strings after they cross the saddle. That in turn changes the downforce on the top and changes the tonal characteristics of the acoustic body. To make things worse, the top was carved from 3/4” thick plates instead of the usual 1”, so this additional height was on top of the 1/4” already added to the bridge saddle. This was really going to push hard into the top.
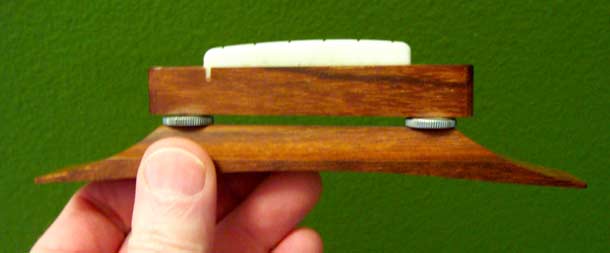
The saddle height is adjustable to a degree using the thumbwheel adjusters, but asking it to make up the entire height difference was too much. It would look ridiculous to have both wood pieces separated by a huge gap, resting on two overextended bridge posts. The quick fix for this was to route the top of the saddle for a piece of Corian, similar to what is used on a flattop acoustic guitar. This looked goofy, too, but it got the job done and sounded OK.
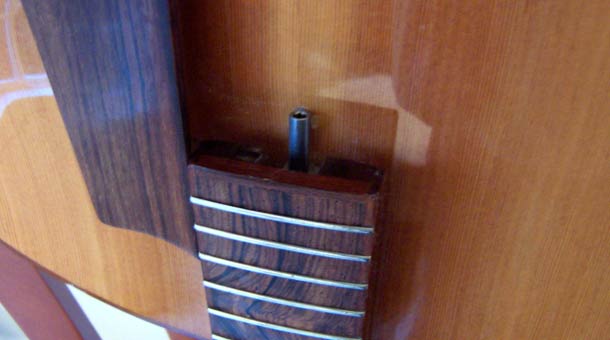
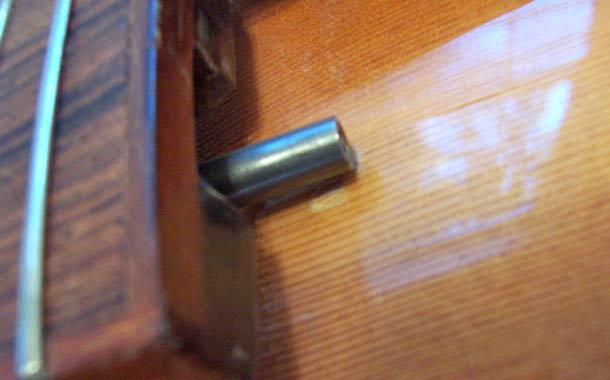
While there was just enough room for a socket to adjust the truss rod nut, it was awkward to get it in there with the guitar strung up. To make things worse, the rod bends when the nut is tightened, which it’s supposed to do. However, when it’s tightened to counteract the string tension, the resulting bending force pushes the threaded brass spacer into the top of the guitar. Besides being really ugly, it damages the top, and I’m sure it’s damping the movement of the top and hurting the tone/volume of the guitar.
LESSONS LEARNED
Usually things are the way they are for a reason. It’s easy now to see why there aren’t many acoustic archtop guitars out there that feature a body end truss rod adjustment. Some of the problems I ran into could be minimized by using a different adjusting nut such as a “spoke” nut and a shallower channel, reducing the neck angle, or mortising the top of the guitar a bit to accommodate the fingerboard extension like a tenon. The easiest design fix, though, is to stick with the traditional headstock adjustment for the rod and be done with it. There were no problems with using the carbon fibre reinforcement bars, so that element could stay in the design.
After this incident, I tend to do a whole lot more visualization in detail to make sure things are going to look and work correctly before building. If it’s an unusual design element or feature, I’ll definitely get more detailed in the drawings.
Another thing I try to do more of is to visualize the physical forces working on the design elements, even if it’s just conceptual. I hadn’t considered the way that the truss rod would bend when the threaded brass spacer adjustment nut was tightened, but it’s a mistake that I could have avoided by just thinking about how the adjustments were going to be made and what would happen when they were done. The same thinking applies to other areas of the guitar that are under tension, load, stress, etc.
POSSIBLE FIXES
Of course, the best fix is to prevent the problem in the first place. Using the traditional headstock adjustment or a spoke nut short of the body join would both be viable design choices. Reducing the neck angle is another. Since the guitar was already assembled and finished by the time I had to deal with the problem, I was left with two options. One was more practical than the other.
The first was to remove the threaded brass spacer and replace it with a more traditional truss rod adjustment nut. These have a hex socket in one end and threads on the other. This proved to be easy enough to adjust with strings on the guitar, and since it’s diameter was less it didn’t foul the top of the guitar when tightened. The bridge was fitted with a Corian saddle as mentioned earlier.
The alternative was to reverse the orientation of the truss rod or shorten the rod and use a spoke nut short of the body join, thin and refit the fingerboard extension, and fabricate a new saddle. This would be much more involved and require enough work to make one consider building a whole new guitar as an attractive solution. The modification steps would look something like this:
- Remove Neck
- Remove Frets and fingerboard, leaving references for reattachment
- Remove Truss Rod and Cap strip
- Extend channel to peghead
- Route adjustment channel, careful not to go too thin at peghead
- Fill unused truss rod channel and adjustment channel under fingerboard extension
- Reverse and reinstall the truss rod and cap strip
- Design, fabricate, and attach truss rod cover
- Reattach fingerboard, true up and radius the surface if necessary
- Re-fret, true, and dress frets
- Thin and refit fingerboard extension
- Shorten heel and dovetail to suit
- Mark fingerboard extension
- Trim and fit extension
- Glue neck
- Check projected bridge height, refit if necessary
- Fabricate new Saddle
WRAP UP
This is just one example where a mistake made with just one design element can have systematic consequences for other parts of the guitar. The problem in this case was not just a cosmetic issue, but also negatively affected the tone of the guitar and it’s long-term health because of the added downforce on the top. The guitar is playable, even with these problems along with others that naturally come with being the first of a particular type of instrument that anybody makes, so it’s not a total loss. It does, however, illustrate the importance of visualizing before cutting wood.
Article written by Paul Buerk, who has a new book about designing electric guitars, without anything going bad! Please leave any comments of questions for the author below.
3 thoughts on “Truss Rods Gone Bad – A guitar design element that didn’t work”
Leave a Reply
You must be logged in to post a comment.
Interesting post! Experimentation is a big part of innovation, so keep at it.
Too bad about that truss rod marking up the top like that. Maybe you should consider the Danelectro design, unajustable unfortunately, but those twin steel bars set into an oblong route was a really good idea. I had a 58 Danelectro neck on a strat body and it was pretty cool! It played a bit like an old Les Paul neck sort of wide and flat and was arrow straight. Have you ever heard of of Carlos Sandoval? He used to do mods on those necks.
The damage to the top is something I can live with. The Target Coatings PSL that’s peeling off the neck is another thing. To be fair, they’ve discontinued that product and replaced it with others that are far more durable.
This particular guitar “featured” other design choices that I’m not entirely pleased with. One is the use of brass nails as fretboard side position markers. They’re very easy to install and look awesome at first, but after time start to tarnish under the finish and become very difficult to see on a dimly lit stage. Not so good, and I have a bass that suffers from the same problem. The other is the cello tailpiece adjuster which has managed to break off three tail pins since completion. Other people love them; I do not. It’s getting replaced with a metal tailpiece in the very near future.
If I had access to a really good CNC rig and could mill a fretboard with a proper relief in it, then I’d be OK with not having an adjustable truss rod. Classical builders and luthiers of traditional stringed instruments can do this by hand, so I suppose it’s something I could consider.
I think you’re referring to Karl Sandoval, maker of lovely polka dotted V’s.